Setting Up Our Files
Sun, Apr 19, 2020
Read in 3 minutes
We're going to be making a form for a telescope loaner program. In this section we'll be covering setting up permissions in the manifest and resource files we'll be using. It will not cover any strings/colors values, as those are basic.
The Manifest
This application needs access to the camera, file storage, and the internet for sending mail. So we need to make sure to give it permission for those things:
<uses-feature
        android:name="android.hardware.camera"
        android:required="true"
/>
<uses-permission
        android:name="android.permission.WRITE_EXTERNAL_STORAGE"
        android:maxSdkVersion="18"
/>
<uses-permission android:name="android.permission.READ_EXTERNAL_STORAGE"/>

<uses-permission android:name="android.permission.INTERNET" />
<uses-permission android:name="android.permission.ACCESS_NETWORK_STATE" />
This should go at the top of your AndroidManifest file. There’s another thing we need to add to the manifest, but we’ll return to it once we reach that stage in the tutorial.
Our Resources
Aside from our layout for the main activity we’re also going to make use of a settings menu and external file paths to store images. The default project structure does not setup these folders so we have to do it ourselves.
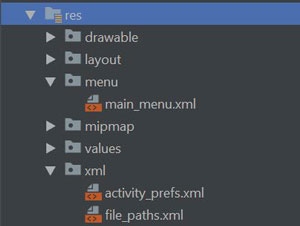
Create a menu and xml directory. Note that the menu directory and the activity_prefs.xml are not needed and could be skipped – this is just how I am setting up some variables for the form.
Menu Directory
Inside of the directory we just made, create a new xml resource file named main_menu.xml. This is going to be our main top nav. For this project we’re just going to put 1 item in it: Settings.
<menu xmlns:android="http://schemas.android.com/apk/res/android">
    <item
        android:id="@+id/menu_settings"
        android:title="Settings"
        />
</menu>
xml Directory
We need two new files in here: activity_prefs.xml and file_paths.xml.
activity_prefs.xml
Now, these are a bit deprecated so feel free to be fancy and do it the way new android wants, but we’re going to use a PreferenceScreen to handle our menu. So what this file does for us is the similar to a layout file.
<PreferenceScreen xmlns:android="http://schemas.android.com/apk/res/android"
android:layout_height="wrap_content"
android:layout_width="wrap_content"
>
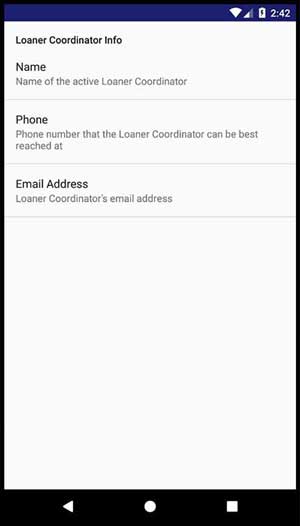
<PreferenceCategory android:title="Coordinator Info">
<EditTextPreference
android:title="Name"
android:key="name"
android:defaultValue="John Doe"
android:summary="Name of the active Loaner Coordinator"
/>
<EditTextPreference
android:title="Phone"
android:key="phone"
android:defaultValue="123.222.444"
android:summary="Phone number that the Loaner Coordinator can be best reached at"
/>
<EditTextPreference
android:title="Email Address"
android:key="email"
android:defaultValue="put-your-email-here@mail.com"
android:summary="Loaner Coordinator's email address"
/>
</PreferenceCategory>
</PreferenceScreen>
Preference Categories are not necessary, but are useful if you have multiple ‘sections’ of settings/preferences for a user. In this case we don’t. However, I like the little title section it provides as just decent UX [user experience].
What default values you place don’t matter, except for the email. Please put your email here, or when we finish setting up the menu go and change the value to your email address. This is the address we’ll use later on in the tutorial.
In the end it will look something like this:
file_paths.xml
This is very important for saving images:
<paths>
    <external-path
        name="loaner_images"
        path="."
    />
</paths>
This tells our app how to save files. We’re using external storage so use the external-path tag, give it a name, and for the path property we just use a dot for the default root. If you want to provide somewhere specific feel free, just know what you’re doing or it may not save.
Setup Done!
Right on, now we can move onto completing our menu.