Calling the Camera
Mon, Apr 20, 2020
Read in 5 minutes
Onto the fun stuff. We're going to setup that 'Take Photo' button to actually do a thing! It's going to launch the built-in camera app, take a photo, and then display that image in our form.
Updating our Manifest
We’re going to need something called a File Provider, which allows us to access file pathing from the app. At the bottom of the manifest file (inside of the tag) we need to declare one such provider:
<provider
    android:name="androidx.core.content.FileProvider"
    android:authorities="ca.noble.android.fileprovider"
    android:exported="false"
    android:grantUriPermissions="true"
>
    <meta-data
        android:name="android.support.FILE_PROVIDER_PATHS"
        android:resource="@xml/file_paths"
    />
</provider>
The authorities property is very important, as we’ll need to use this exact string inside of our Main Activity. It’s easiest to set it up as whatever you’ve made the beginning of your package name followed by ‘android.fileprovider’.
The meta data resource property is a link to that file_paths.xml we setup in the first post of this tutorial series.
Editing the Main
To begin, we need to make a constant number which will be known as our REQUEST_IMAGE_CAPTURE, grab our headshot ImageView, and make a string to store the path to our saved image on the device. All class-level variables:
static final int REQUEST_IMAGE_CAPTURE = 1;
ImageView headshot;
String imagePath;
Next, back to that empty onClick method to setup a switch and code the logic for our takePic button.
switch(v.getId()) {
    case R.id.btn_takePic:
        Intent takePicIntent = new Intent(MediaStore.ACTION_IMAGE_CAPTURE);

        // Check that we have access to the Camera activity to handle the intent
        if (takePicIntent.resolveActivity(getPackageManager()) != null) {
            File imageFile = null;
            try {
                imageFile = createImageFile(REQUEST_IMAGE_CAPTURE);
            } catch (IOException e) {
                // error handling here
            }

            // Confirm an image was made then prepare to set in view
            if (imageFile != null) {
                Uri imageURI = FileProvider.getUriForFile(
                        this,
                        "ca.noble.android.fileprovider",
                        imageFile
                );

                takePicIntent.putExtra(MediaStore.EXTRA_OUTPUT, imageURI);
                startActivityForResult(takePicIntent, REQUEST_IMAGE_CAPTURE);
            }
        }
        break;
    case R.id.btn_clearSignature:
        break;
    case R.id.form_save:
        break;
}
How this reads is first we need to create a new Intent to call the camera then confirm we’re allowed access to camera before we start depending on it. Should that pass we make an empty File variable and then call a function (we need to code) to create a temporary image file from what the camera returns.
Should the file be made successfully, we make a URI path utilizing our handy file provider from the manifest and passing it the image file we just made. Just like a bundle, we add a MediaStore Extra to our picture intent and then dive into what is called a startActivityForResult method.
startActivityForResult
This is an override method. It takes a request code, result code, and an intent. We setup an if statement inside it that checks against our REQUEST_IMAGE_CAPTURE constant and a RESULT_OK constant, which is returned by the Camera should the user hit the ok/accept/checkmark after taking a picture. Should both of these pass then we want to populate our headshot ImageView with the image.
@Override
protected void onActivityResult(int requestCode, int resultCode, Intent data) {
    if (requestCode == REQUEST_IMAGE_CAPTURE && resultCode == RESULT_OK) {
        headshot = findViewById(R.id.headshot);
        Bitmap image = BitmapFactory.decodeFile(imagePath);
        headshot.setImageBitmap(image);
    }
}
A Bitmap is just android’s catchall for image types, and comes with a nice collection of things such as BitmapFactory for handling a range of actions. Here we’re just using it to decode the file found at the imagePath we will be making next.
createImageFile
This is the function that will handle our file creation for both the Camera & Signature (canvas). Because we’re going to be using it for 2 different purposes we’ll pass it our requestCode as a parameter, but for now we’re just dealing with the Camera side of it. If you’re uninterested in the Canvas portion you don’t need to give it a parameter.
private File createImageFile(int reqCode) throws IOException {
    File storageDir = getExternalFilesDir(Environment.DIRECTORY_PICTURES);
    String timeStamp = new SimpleDateFormat("yyyyMMdd_HHmmss").format(new Date());
    String fileName = "JPG_" + timeStamp + "_";
    File file = File.createTempFile(fileName, ".jpg", storageDir);

    if (reqCode == REQUEST_IMAGE_CAPTURE)
        imagePath = file.getAbsolutePath();
    else
        // signature/canvas stuff

    return file;
}
The getExternalFilesDir will use a ‘Pictures’ folder found (or created if non-existent) on our formatted SD Card. After we take our first picture we’ll track it down to make sure it’s saving appropriately. Which we should be able to do now! But one thing’s first…
Permission Settings on Device
Despite that we ask for them sometimes they don’t get set to allow on the device. So after you run the app go into your device Settings -> Apps -> OurApp (I called it Loaner Form). You’ll see that under the permissions it says ‘No permissions granted’.
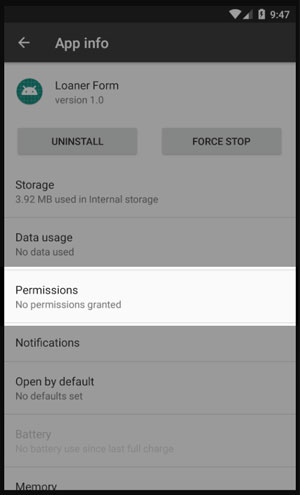
Let’s fix that and give our app permissions. Then go ahead and press that ‘Take Photo’ button in our app!
Depending on the device your camera may or may not rotate the picture… and it may or may not do this in the camera activity or wait until you’re back in the form. Each device is different and needs tailoring. I am not covering that in this tutorial.
Once you hit the big checkmark and come back to your form you should see the headshot ImageView populate with your photo. But can we find it in our files? Let’s go see! Go back into the phone settings and find something for Storage. Select the Internal Shared Storage and go to Other and Explore.
You should be brought to an Android SDK screen with a buncha folders. Select Android -> data -> then find the package name for your project and select that. Then it should just be a couple more single folders until you find it!
Camera Intent Done
That concludes setting up our camera call. Next up: the Canvas!