Basic Form Fields
Mon, Apr 20, 2020
Read in 6 minutes
Time to start delving into the bulk of the app. We've gotta build out the form layout and start hookin' up fields'n buttons. Aside from simple edit texts we'll also throw in a date picker, checkbox, vector asset, and an alert.
The Layout
<ScrollView
    xmlns:android="http://schemas.android.com/apk/res/android"
    android:layout_width="match_parent"
    android:layout_height="match_parent"
    android:padding="15dp"
    android:background="@color/colorGrey"

>
    <LinearLayout
        android:layout_width="match_parent"
        android:layout_height="wrap_content"
        android:orientation="vertical"
    >
        <!-- COORDINATOR INFORMATION -->
        <TextView
            android:layout_width="wrap_content"
            android:layout_height="wrap_content"
            android:text="Loaner Coordinator Info"
        />
        <LinearLayout
            android:layout_width="match_parent"
            android:layout_height="wrap_content"
            android:orientation="horizontal"
            android:layout_marginBottom="32dp"
        >
            <EditText
                android:id="@+id/et_coord_name"
                android:layout_width="0dp"
                android:layout_height="wrap_content"
                android:layout_weight="2"
                android:layout_marginRight="10dp"
                android:hint="Name"
            />

            <EditText
                android:id="@+id/et_coord_phone"
                android:layout_width="0dp"
                android:layout_height="wrap_content"
                android:layout_weight="1"
                android:hint="Phone"
            />
        </LinearLayout>

        <!-- EQUIPMENT INFORMATION -->
        <EditText
            android:id="@+id/et_scope_name"
            android:layout_width="match_parent"
            android:layout_height="wrap_content"
            android:layout_marginBottom="16dp"
            android:padding="5dp"
            android:textSize="24sp"
            android:hint="Telescope Borrowed"
            android:background="@color/colorWhite"
        />

        <TextView
            android:layout_width="match_parent"
            android:layout_height="wrap_content"
            android:textSize="16sp"
            android:text="Additional Equipment"
        />
        <EditText
            android:id="@+id/et_other_equipment"
            android:layout_width="match_parent"
            android:layout_height="100dp"
            android:padding="5dp"
            android:layout_marginBottom="16dp"
            android:inputType="textMultiLine"
            android:gravity="top"
            android:background="@color/colorWhite"
        />

        <!-- RENTAL PERIOD -->
        <TextView
            android:layout_width="wrap_content"
            android:layout_height="wrap_content"
            android:text="Lending Period"
        />
        <LinearLayout
            android:layout_width="match_parent"
            android:layout_height="wrap_content"
            android:orientation="horizontal"
            android:layout_marginBottom="32dp"
        >
            <EditText
                android:id="@+id/et_fromDate"
                android:onClick="setDate"
                android:layout_width="0dp"
                android:layout_height="wrap_content"
                android:layout_weight="1"
                android:layout_marginRight="10dp"
                android:layout_marginEnd="10dp"
                android:hint="From"
                android:clickable="true"
                android:focusable="false"
                android:inputType="none"
            />
            <EditText
                android:id="@+id/et_toDate"
                android:onClick="setDate"
                android:layout_width="0dp"
                android:layout_height="wrap_content"
                android:layout_weight="1"
                android:hint="Return Date"
                android:clickable="true"
                android:focusable="false"
                android:inputType="none"
            />
        </LinearLayout>

        <!-- BORROWER INFORMATION -->
        <LinearLayout
            android:layout_width="match_parent"
            android:layout_height="wrap_content"
            android:orientation="horizontal"
            android:layout_marginBottom="16dp"
        >
            <TextView
                android:layout_width="wrap_content"
                android:layout_height="wrap_content"
                android:text="Borrower's Info"
                android:layout_marginRight="24dp"
            />
            <CheckBox
                android:id="@+id/cb_is_member"
                android:onClick="checkboxClicked"
                android:layout_width="wrap_content"
                android:layout_height="wrap_content"
                android:text="Is a Member?"
            />
        </LinearLayout>

        <LinearLayout
            android:layout_width="match_parent"
            android:layout_height="wrap_content"
            android:orientation="horizontal"
            android:layout_marginBottom="16dp"
            >
            <EditText
                android:id="@+id/et_borrower_name"
                android:layout_width="0dp"
                android:layout_height="wrap_content"
                android:layout_weight="2"
                android:layout_marginRight="10dp"
                android:hint="Name"
                />

            <EditText
                android:id="@+id/et_borrower_phone"
                android:layout_width="0dp"
                android:layout_height="wrap_content"
                android:layout_weight="1"
                android:hint="Phone"
                />
        </LinearLayout>
        <EditText
            android:id="@+id/et_borrower_email"
            android:layout_width="match_parent"
            android:layout_height="wrap_content"
            android:hint="Email Address"
            android:layout_marginBottom="16dp"
        />

        <!-- CAMERA SECTION -->
        <LinearLayout
            android:layout_width="match_parent"
            android:layout_height="wrap_content"
            android:orientation="horizontal"
            android:layout_marginBottom="16dp"
        >
            <Button
                android:id="@+id/btn_takePic"
                android:layout_width="0dp"
                android:layout_height="wrap_content"
                android:layout_weight="1"
                android:padding="5dp"
                android:textSize="16sp"
                android:textColor="@color/colorWhite"
                android:text="Take Photo"
                android:textAllCaps="false"
                android:background="@color/colorPrimary"
            />

            <ImageView
                android:id="@+id/headshot"
                android:layout_width="0dp"
                android:layout_height="125dp"
                android:layout_weight="1"
                android:layout_marginLeft="10dp"
            />
        </LinearLayout>

        <!-- DEPOSIT INFORMATION -->
        <TextView
            android:id="@+id/tv_deposit"
            android:layout_width="match_parent"
            android:layout_height="wrap_content"
            android:layout_marginBottom="10dp"
            android:textSize="20sp"
            android:text="@string/form_deposit40"
        />

        <!-- TERMS AND CONDITIONS, AGREEMENT -->
        <LinearLayout
            android:id="@+id/ll_terms"
            android:onClick="openTerms"
            android:layout_width="wrap_content"
            android:layout_height="wrap_content"
            android:orientation="horizontal"
            android:layout_marginBottom="24dp"
        >
            <TextView
                android:layout_width="wrap_content"
                android:layout_height="wrap_content"
                android:textSize="18sp"
                android:text="Rental Agreement"
            />
            <ImageView
                android:layout_width="12dp"
                android:layout_height="12dp"
                android:layout_marginLeft="8dp"
                android:src="@drawable/ic_expand"
            />
        </LinearLayout>
        <TextView
            android:layout_width="match_parent"
            android:layout_height="wrap_content"
            android:text="I understand and agree to..."
            android:layout_marginBottom="10dp"
        />

        <!-- SIGNATURE SECTION -->
        <LinearLayout
            android:layout_width="match_parent"
            android:layout_height="wrap_content"
            android:orientation="horizontal"
            android:layout_marginBottom="16dp"
        >
            <TextView
                android:layout_width="0dp"
                android:layout_height="wrap_content"
                android:layout_weight="2"
                android:textSize="20dp"
                android:text="Signature"
            />

            <Button
                android:id="@+id/btn_clearSignature"
                android:layout_width="0dp"
                android:layout_height="wrap_content"
                android:layout_weight="1"
                android:textSize="16sp"
                android:text="Clear"
                android:textColor="@color/colorWhite"
                android:textAllCaps="false"
                android:background="@color/colorPrimary"
            />
        </LinearLayout>

        <LinearLayout
            android:id="@+id/canvas_signature"
            android:layout_width="match_parent"
            android:layout_height="120dp"
            android:layout_marginBottom="32dp"
            android:orientation="vertical"
            android:background="#fff"
        />

        <!-- FINISH BUTTON -->
        <Button
            android:id="@+id/form_save"
            android:layout_width="match_parent"
            android:layout_height="60dp"
            android:textColor="@color/colorWhite"
            android:textSize="18sp"
            android:text="Finish"
            android:background="@color/colorPrimary"
        />
    </LinearLayout>
</ScrollView>
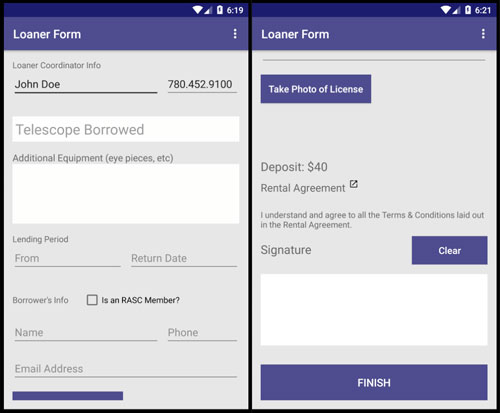
If you want a shorter form feel free. The important things to keep are the Loaner Name & Phone (if you setup the menu) and any fields you want to learn about. Such as the rental period (our date pickers), checkbox & Deposit Section, Camera Section, Terms Section (for dialog & vector icon), and the Signature Section.
The Camera & Signature will have separate tutorial steps.
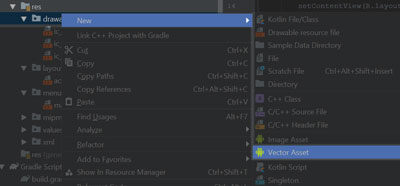
Vector Asset
Importing vector assets is pretty trivial. Make sure you have an SVG saved somewhere. To get it into your app find the drawable directory in the res folder. Create a new Vector Asset. When prompted search Local Files for SVGs, find and select your file, edit it’s name and size to whatever’s suitable for you.
I’ve grabbed an expand icon from flat icon and imported it at size 32px. That’s bigger than I need (we’re using it at ~12px in the layout above) but a reasonable size should it ever be used elsewhere. For placing in the layout, whatever you name your file you can find the Image View underneath the Terms Section of the layout and replace the drawable reference.
Onto the Main Activity
As class level variables setup:
EditText dateText
boolean isMember
Then after our existing default/Prefs assignment initialize our checkbox boolean to false:
isMember = false
Now to get our buttons hooked up!
We need to implement an OnClickListener, then create Button variables that link to our three buttons: Take Photo, Clear Signature, and Finish.
public class MainActivity extends BaseActivity implements View.OnClickListener {

    static String coordName;
    static String coordPhone;
    EditText dateText;
    boolean isMember;

    @Override
    protected void onCreate(Bundle savedInstanceState) {
        super.onCreate(savedInstanceState);
        setContentView(R.layout.activity_main);

        //
        // ... our previous code
        //

        isMember = false;

        // Prepare Buttons
        Button btnTakePic = findViewById(R.id.btn_takePic);
        btnTakePic.setOnClickListener(this);

        Button btnClearSig = findViewById(R.id.btn_clearSignature);
        btnClearSig.setOnClickListener(this);

        Button btnSave = findViewById(R.id.form_save);
        btnSave.setOnClickListener(this);
    }
}
You may notice our class is all red squiggly… cause we need to implement the onClick method. Go ahead and implement it, but we’ll leave it empty for now and come back to it.
Checkboxes
Pretty straightforward and easy to do. For this example we’re just going to switch out some text on the form based on whether the borrower is a member or not.
In our Layout file you may notice that on our CheckBox we put an onClick property on it. This tells our app what function to call should the checkbox be clicked, but it’s not an inherent function – we have to make it.
public void checkboxClicked(View v) {
    boolean checked = ((CheckBox) v).isChecked();
    TextView tvDeposit = findViewById(R.id.tv_deposit);

    if (checked) {
        tvDeposit.setText("Deposit: $0");
        isMember = true;
    } else {
        tvDeposit.setText("Deposit: $40");
        isMember = false;
    }
}
When clicked, it will fire this function we just made and pass it the element (called v). We cast this ‘view’ as a CheckBox and then find out whether it’s checked or not. Based on that value we display a different value string for the Deposit text view on our form. Nice’n simple.
Edit Text as a Date Picker
Similar to our checkbox, in the layout we also put an onClick function called setDate. So let’s make that.
public void setDate(View v) {
    dateText = (EditText) v;

    new DatePickerDialog(MainActivity.this, date,
            mCalendar.get(Calendar.YEAR),
            mCalendar.get(Calendar.MONTH),
            mCalendar.get(Calendar.DAY_OF_MONTH)
    ).show();
}
We have this function set on both of our lending period Edit Texts, so we’re making this as general as possible for reusability. We have to get the specific Edit Text that called the function and then call a DatePickerDialog; of which we also need to setup ourselves.
Above this function let’s create a DatePickerDialog:
final Calendar mCalendar = Calendar.getInstance();

DatePickerDialog.OnDateSetListener date = new DatePickerDialog.OnDateSetListener() {
    @Override
    public void onDateSet(DatePicker view, int year, int month, int dayOfMonth) {
        mCalendar.set(Calendar.YEAR, year);
        mCalendar.set(Calendar.MONTH, month);
        mCalendar.set(Calendar.DAY_OF_MONTH, dayOfMonth);

        SimpleDateFormat dateFormat = new SimpleDateFormat("yyyy-MM-dd", Locale.CANADA);
        dateText.setText(dateFormat.format(mCalendar.getTime()));

        if (dateText.getId() == R.id.et_fromDate) {
            mCalendar.add(Calendar.MONTH, 1);

            EditText toDate = findViewById(R.id.et_toDate);
            toDate.setText(dateFormat.format(mCalendar.getTime()));
        }
    }
};
This is nothing fancy. A standard date dialog you can find anywhere… except I added an if statement at the end. Since the standard lending period of a telescope is 1 month, should the user set the ‘From’ date, then the ‘Return Date’ field will automatically be populated with the date 1 month from that. This does not affect the clickability of the ‘Return Date’ field either, so the user can still edit that field if they need to.
And that’s it. Now when clicked those fields should populate with a date.
Terms & Conditions Dialog
Perhaps a bit moot since we just did the date picker, but oh well.
See our favorite onClick in the layout file? That’s right here’s another one! This time we’re just going to open up an AlertDialog.
public void openTerms(View v) {
    AlertDialog terms = new AlertDialog.Builder(this)
            .setTitle("Rental Agreement")
            .setMessage("This is the body of the alert dialog where you can put in whatever text you want")
            .setPositiveButton("I Agree", null)
            .create();
    terms.show();
}
Pretty bog standard and nothing too special there. If you want, you could also include a .setNegativeButton as well; and even a Neutral button. Though by that time you probably want to dig into making a custom alert dialog instead.
Basic Form Complete
And with that we have all of the form layout complete and hooked up all the simple parts. Now to just get that Camera & Canvas, as well as the form submission done!